My daughter (now, a teacher) and I were sitting together while she was still cozy in her kitty jammies this morning…me, at the dining table, she, on the stairs…she was telling me about a very inspiring Convention session that she attended on Thursday of this past week. It turns out that the presenter was Ron Wigglesworth. As soon as I started exploring his posts on the internet, I realized how his contributions to education and to students has been exceptional. Anyone who has encouraged a connection between drawing and biology is great in my eyes…in fact, I’d have to say that he has done a lot of connecting between diverse disciplines.
I got thinking about archives of various projects and things that my students have explored in the past and I just thought I’d write a post that featured those. I had fun teaching and in retrospect, I’m pretty sure that I saw the students’ hands, hearts and minds as extensions of my own. I’m grateful for their hard work, their talents and their commitment. For me, it was never about the marks. A sampling…digital…there’s a load of stuff in my photo albums. And, today, I’m celebrating it all.
As a retired person, I see more and more the outrageously crazy and demanding life of educators out there. Masters of all things, teachers are responsible for the constant changing world of demands placed down before them. I have such admiration for them.
When I have opportunity to work with children, in my specialized world of visual arts, I am blown out of the water by their desire to learn how to see their visual world, learn to draw and master a variety of media. Yesterday this was no more evident. I was thinking about the fact that more and more reflection and drawing are being sacrificed in lieu of a more packaged and close ended result for the purpose of display, such as the results provided by a ‘Pinterest idea’. In fact, I post my lessons on to the Pinterest site, in the hopes that the lessons will minimize fear about the process of teaching drawing. I don’t know if I can impact any of this anymore, but I treasure the opportunities that teachers give me to further my research and practice. I am still learning.
If teachers pressure either themselves or their students to create a ‘pretty’ end result, the child is trained to ask that forever-question in the art room…”Is this good?” instead of entering the dance of creation. I think that focusing on an open-ended result and curbing adult expectations of ‘what makes good art’ is warranted, although it may be a practice that is unfamiliar.
While the step-by-step process teaches a whole other skill set, it is not necessarily the way to go about nurturing the artist soul. The very pieces of art strung up down those hallways that achieve the giggles from the viewer, are likely the pieces that represent the children who are filled with artistic magic. Embrace that with everything that is in you.
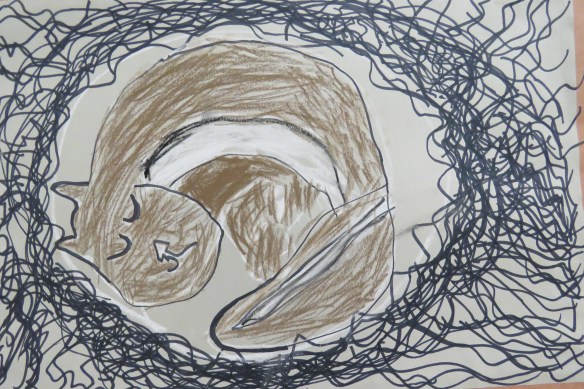
Yesterday, I watched a grade three Hibernating Animals lesson unfold…absolutely a magical experience! For now, I’m just going to post very few pieces that represent the process of evolution that takes place when art lessons are child-centered and not adult-centered. The ‘before’ depictions gauged where the students were in their imaginations, with absolutely no instruction…just a brainstorm list of animals that hibernate.
Observe…the animals have smiles on their faces. The eyes are dominant. The little legs are outstretched, in this case, two legs consistently on each animal. The body form is coloured in. The nest or den is a circle.
I then had the students pretend to be a hibernating mice on the classroom floor.
They automatically bundled up in a closed circle. I asked them to notice where their legs were…their tucked in heads…where their arms were, wrapping around their legs. I had them rest like that for a while, with the lights dimmed. They automatically stretched when I asked them to stand and return to their desks.
When the movie was finished, I went to the board and told the students that we would be focusing on hibernating FURRY animals just for today, so we wouldn’t be drawing bats or snakes or insects hibernating. I told them we wouldn’t think about scorpions today, either, because we would be thinking about animals that hibernate near us, in Calgary. We listed those on our white board. Ground squirrels, chipmunks, mice, rabbits, beaver, skunks…
I drew an exemplar on the board of the kinds of things that an animal might add to their nest. We looked at the kinds of lines that make a cozy home for the winter.
We then discussed if we could see the animals bundled up, what would we see? Closed eyes…curled up tail…ears that were back on the head…maybe one leg or just a paw. The animal would want a curled up little bundle and not a great big space. I had the students join me in the reading corner and read them a picture book about hibernation where we saw some beautiful photographs of animals in their nests and dens.
Their After drawing…look at the leap in their understanding of the visual world….after a body gym exercise, a movie and a discussion about how to draw grass and straw, how to draw fur and what would we see. This is where you will see more distinction between the individual student’s schema. Don’t be alarmed if some still see their world in a more flat or symbolic way. This is where you let the students be individuals. You can guide with leading questions, but really aim to NOT frustrate the students. They are NOT right or wrong.
For expressive relief, after such concentration and after a recess break, the students decorated a picture frame for their piece with snowflakes…absolutely any way they wished. We used chalk. Given time, I would do this entire project in paint, but I was exploring an idea and this media made for an opportunity for me to see how I would revise the lesson. Classroom teachers could use this idea of the picture frame on any project or piece of writing. Colour of frame and motif can vary.
Then the students found their nest.
Using chalk as the media for drawing, the students worked from their visual journal After sketches, to create their hibernating animals. Once again, scale was an issue. I discovered that their animals became smaller and skinnier as they placed them in these large nests. This makes me smile…a result I didn’t anticipate and would likely spend some time talking to them about body mass if I explored this again.
The results in this particular activity could not possibly be anticipated. However, the process was invaluable and I enjoyed every minute of interaction with the students. It isn’t easy ‘letting go’, but it’s imperative. After this experience, I will be able to revise my lesson and further develop its outcomes.
I still have reservations about adult paint nights and classes that hinge on having students create images after an exemplar. I think it’s just important to enjoy those experiences for what they are, a way to master techniques, materials or to train motor skills. They are not experiences that lean toward the development of creative thought. Closed-ended formulas are never as valuable as open-ended formulas. For the record, my thoughts only!
I read a beautifully illustrated book to the grade threes about the meaning of the poppy. Thank you, Wilma, for leaving that for us. I mixed up a few shades of red during the lunch hour, deciding last minute to go ahead and use tempera with the students. I think students are always somewhat in awe when I recite the words to the poem, ‘In Flanders Fields’, by memory. I told the grade threes that my teacher, Miss Goodrich, had us memorize it when I was in grade three. Once in the heart, poetry never seems to leave.
I showed them a painting I did back in 1997 and told them that I hoped to show them how to depict poppies. On the board, I showed them a symbol for poppy…how we draw or make a poppy in a simple way.
We talked about the organic…zig zagging…crinkly texture of the poppy flower and about the construction of the central part of the flower as well. I told them the story of my great grandfather and about how the poppies bloom in early spring in these beautiful cemeteries of France.
While I did not use this video, I suppose you might, if you don’t feel confident about drawing.
I just drew poppies from different points of view right on the white board in the classroom. The students, on white paper folded into four, practiced depicting poppies a number of times and put a little smiley face next to the one they would use as a reference for their large composition.
I always encourage large compositions to be planned out, using white chalk. But these days, very few schools stalk white chalk, given new technologies. This class pulled out a red or pink or white crayon and marked their four compass points on their paper edges. Their mouths dropped open as they could visualize that the expectation was that their poppies would touch each of those edges and be that large! To simplify…drawings were done and revised in wax crayon, red fill in of general shapes completed; purple, yellow and black details were added last. The poppies were then cut out.
I didn’t archive the entire process, but these photos are pretty representative. Thank you, Wilma for your class! They were awesome and very receptive.
I taught grade four students in the afternoon. I guided them through some free form water colour pieces, but first, encouraged them to complete four studies of the heron in order to understand proportions.
I shared some of my recent photographs of the heron that’s been hanging out, fishing, at Frank’s Flats.
The students folded a piece of paper into four to use for their practice drawings. This gave them the idea of how tall their herons needed to be…head touching the top, feet touching the bottom. We used a very contrived series of steps, but step by step instructions are sometimes super helpful, especially when learning the basic structures of an animal or bird. I used this one and projected it on the smart board.
To learn something of the water colour process, I did a demonstration and we used their favourite LARGE heron sketch and applied the water colour to the sketch. I discovered that the most difficult two things about drawing a heron were, how to make it large enough and how to create that ‘S’ movement in the neck. The final water colour painting was done on transparent paper that was placed on top of their coloured sketch and rendered with no use of pencil.
We watched a couple of Youtube videos where WC techniques were explored in a minimalist approach.
And so…from there, this is what we used. By the way, reuse those Lunchable snack trays for palettes. I found those tucked in the storage room. Also the students need pencil for their depictions, a variety of water colour brushes (soft bristle) a small squeeze of payne’s grey, blue, and later, yellow to be mixed with both for the bull rushes, a yogurt container with a small bit of water in it. That should do. Remember that if you don’t have a sink in your classroom, ask the caretaker to give you a wash bucket half filled with water. Works great.
Using leftover paints quickly involves dumping complementary colours together and mixing them to get a variety of earth tones and browns. This way, the art teacher can get a lunch time jump start on cleaning buckets out before the weekend.
The artist, Paul Klee, has an amazing history. I am absolutely entertained by his work and have read extensively about him. His journals, found in The Diaries of Paul Klee: 1898 – 1918 is fascinating and captures the huge link between his passion for music and for art.
His journals are filled with diagrams and notations, but most interesting to me are his observations of nature, weather, time and the city. He was a master of observation and yet his schematics are other-worldly and child like.
An interesting phenomena happens with children in school art programs or structured after-school art classes. Basically, they have a desire to draw LIKE GROWN UPS…make everything LOOK REAL. So, this activity turned out to be much more difficult than my readers might imagine. I needed to give the children permission over and over again to be playful and to invent and to doodle and let go of their wish to make things ‘look real’.
At snack time, the students have been listening to a settling CD…the story of Harry Potter. In today’s pre-recess listening session, images of shooting stars pouring out of the sky, owls filling the skies, skinny people, characters wrapped in cloaks all came up. I hoped that later on, the images would spark some design and pattern ideas.
Just a half hour before lunch, I had the students divide their square formats into four triangles, using chalk for their drawing. As a way of simulating Paul Klee’s work, this would pick up on the geometric division of space that is often seen in the artist’s works.
We looked at a piece by Paul Klee titled Plants, Earth and Empire 1918 that was similarly divided into four triangles. I haven’t been able to find an image of this piece on line, however the piece below has similar elements to this one (House Interior 1918), but with a single line later being the division between an ‘above ground’ world and a ‘below ground’ world, organized above and below a diagonal organic line..
The students shared the paint palette (station), selecting four different earth tones for their compositions. I’ve explained how to set up for painting in this lesson. The pre-lunch painting gave the lunch break for the tempera paintings to dry.
After lunch, I gave the students a brief introduction to Paul Klee, the artist, along with the following video projection.
Here’s a better one…if you have the time! In fact, this is beautiful and you may want to sit with your coffee, readers, and just enjoy.
I turned on the funk music and had the students practice depicting their imagined world, after looking at this video of Paul Klee’s works. I had the students fold over their drawing paper in order to use a square format, the same as their composition. I spoke to them about creating a line that moved from one side of the square to the other. This would create a division between an imaginary world above the ground and under the ground. I suggested that if it was hard ‘to start’, they could begin with the list of Harry Potter images we had left on the white board.
When the students felt ready, they could begin working on their larger compositions. I suggested that they draw first with pencil and then retrace their pencil lines with permanent black marker. I felt that there was some preciousness or concern in the students and thought this might give them more confidence. In future, I’d hand them over the permanent markers and skip the pencil step. To create accents, I suggested that the students use oil pastel to colour in three or five or seven or nine or eleven shapes. Here is a little of what they came up with while the funk music played in the background.
I had a placement this afternoon where the class, in fact, the entire school, had opportunity to watch a morning theater performance, “Emily Carr – Small Wonders” performed by Canadiana Musical Theatre. So, it only made sense that I follow that with an art extravaganza in the Grade 2 class. This class has been helping me with my french lately and this has been great fun.
First, we got the projector warmed up and watched a couple of short movies about Emily Carr, the artist. While the children enjoyed the morning performance, they didn’t have opportunity to learn a lot about Emily’s art. As we looked at several tree and landscape images, we talked about the wind and about the blowing shapes, in the sky, on the land and in the trees. There was a bit of chat about British Columbia and the big tall evergreen trees and imagining walking through the woods there in the dark.
Before recess, we opened nine factories, most having two factory workers, but some, having three. I reused chart paper that was set aside in the art storage room, as factory place mats, deciding to use that for collage paper later on as well. Here, the students prepared a lot of collage papers in the approach of Henri Matisse, to be later selected and used for creating a personal landscape in the manner and energy of Emily Carr.
So, the factory workers went to work, using white, yellow, turquoise, green and blue tempera paint blocks and large brushes. A helpful tip is to keep paint blocks out of the individual cupped containers as those are very tricky to clean. Instead, I just set them out on palettes or margarine container lids. Much easier to wipe off afterwards. Reminders to the students: “Stroke, don’t scrub, your brushes.”
Time for recess! Over the fifteen minutes, the collage papers dried and I cleaned out the water containers, the brushes and the palettes. Ready for students to rumble!
The students entered, rosy cheeked and eager. I projected the following image for some sketching in their sketch books. I also demonstrated how when we draw evergreen trees, we don’t have to draw all of the individual branches, but can draw big clumps of branches all at one time. Among the Firs 1931
To begin our compositions, we sorted our papers into two big piles on the floor, like piles of leaves. We talked about the way the wind blows most of the time…side to side…this way and that…most of the time it’s not going up and down. So, I initially requested a vertical composition (up and down), with the wind motion being wavy, but side to side. “Mix up your papers, guys, to get lots of variety!” I had brought a long a bag full of cardboard cut to size (different sizes and shapes) for compositions and a variety of tree trunks, strips also cut out of boxes.
I showed them Above the Gravel Pit by Emily Carr.
The results…ta duh!
With advanced and Division II classes, you might add three layers of hills (foreground/middle ground and background)…and several trees. At all grade levels, given time, you might also want to add textures/shading/highlighting onto the tree forms with oil pastel, before gluing. Because this is a young group and I am a visiting teacher, one tree did the trick!
Thank you, Grade 2, for the magic of an afternoon making art!
I enter the class in the morning quiet, and clip my laminated image of Gustav Klimt’s Tree of Life under two clips at the front board. We greet, sing O’ Canada, say our morning prayer, take attendance and then practice the letter O in cursive handwriting, upper and lower case.
Quad, Quatrain, Quartet, Quadrant, FOUR!!! A quatrain has four lines! FOUR LINES RHYMING!
Rhyme Schemes? Let’s just look at the last words of each line…for now, let’s just forget about the rest!!
Mat
Snow
Chat
Flow
YES! ABAB rhyme scheme! Now, let’s play a game…do lots of them…let’s do it until we get it! Name the rhyme scheme!
Today it’s some where around -25 degrees, so you may stay in for your recess break!
This painting, The Tree of Life, was created by an artist named Gustav Klimt…tell me everything that you see in this painting. Anything you see is alright with me! And…for everything you see…try to find a rhyming word! This will be our wall of words to choose from. Will you write a poem for your own Tree of Life today? A rhyming quatrain?
First…decide on a title. Mine is The Blessing Tree! Ideas? Whispering Tree! Dancing Tree! Golden Tree! All good ideas! Now, write your title down in your notebook so that you don’t forget. This is the title for your own tree poem. Next, choose a rhyme scheme…whatever one you want! Print it down the right hand side. (ABAB or AABB or ABCA…whatever you like) Pick words from your rhyming word lists and place them in the order you want, remembering always that the last word of the very first line of a quatrain will always be named ‘A’. Now…the final challenge is to add words that come before each of your four ‘last words’. Let’s edit…let’s look for other words…let’s look for better words. Now, LET’S GO ENJOY LUNCH!
Buckets of white paint to be shared with a partner…two tbsps. of white tempera should do for this! Let’s look again at Gustav Klimt’s. Look at the trunk of the tree. It is pretty short compared to a lot of other trees. Look at the limbs and the branches of the tree. Describe the sort of lines needed to paint these. Let’s look at the word wall….and take some of our own rhyming words…COIL, SWIRL, SPRING. This is how you dip and wipe your brush and this is how you care for the bristles of the brush. Now, begin…touching three of your paper edges with long branches of the tree. Gustav Klimt filled his space with the branches of his tree.
While you’re exchanging your books in the library, I’ll clean the brushes!
Now, let’s look at some of the repeating patterns used by Klimt. Triangles, eyes, there’s a bird! There is a station over here with gold paint if you’d like to add some while you work. Here are some oil pastels. You can also use your pencil crayons. Let’s think of a colour family though…colours that repeat some of the paper colours…pink, turquoise, blue, white, red…time to create!
And finally, in pencil first, and then traced again with a fine marker or pencil crayon, your title and rhyming quatrains! Voila!
I was blessed by you today, grade four students! What wisdom! What engagement!
Shannon Williamson, Assistant Director of Jarvis Hall Fine Art, introduced us to Carl White. She was bright eyed and smiling as she explained that this was the last day for the exhibit. My readers might remember that I had written of the opening event, but this was a wonderful thing to be able to have the artist to ourselves for conversation and inspiration. I circled Carl like a shark at the opening, but never did get closer than four feet from him…openings are just like that. This tour was oh-so-much-better!
Some of the topics that Carl White explored during his artist talk were poetry, cursive writing, romanticism, art as layering of skin/flesh, teacher as facilitator and Gnosticism. It was a thought provoking morning and the conversation certainly informed the work and our experience of the pieces. Shannon generously pulled out some of Carl’s earlier works that contributed to an even broader context. Thank you, Carl White, for your time and your thoughts.
Words carried away in my heart as we left the gallery…”Kath, who is your e?”
2 After Jesus was born in Bethlehem in Judea, during the time of King Herod, Magi[a] from the east came to Jerusalem 2 and asked, “Where is the one who has been born king of the Jews? We saw his star when it rose and have come to worship him.”
3 When King Herod heard this he was disturbed, and all Jerusalem with him. 4 When he had called together all the people’s chief priests and teachers of the law, he asked them where the Messiah was to be born. 5 “In Bethlehem in Judea,” they replied, “for this is what the prophet has written:
6 “‘But you, Bethlehem, in the land of Judah,
are by no means least among the rulers of Judah;
for out of you will come a ruler
who will shepherd my people Israel.’[b]”
7 Then Herod called the Magi secretly and found out from them the exact time the star had appeared. 8 He sent them to Bethlehem and said, “Go and search carefully for the child. As soon as you find him, report to me, so that I too may go and worship him.”
9 After they had heard the king, they went on their way, and the star they had seen when it rose went ahead of them until it stopped over the place where the child was. 10 When they saw the star, they were overjoyed. 11 On coming to the house, they saw the child with his mother Mary, and they bowed down and worshiped him. Then they opened their treasures and presented him with gifts of gold, frankincense and myrrh. 12 And having been warned in a dream not to go back to Herod, they returned to their country by another route.